How we found a transmitter's lost IP address with Wireshark
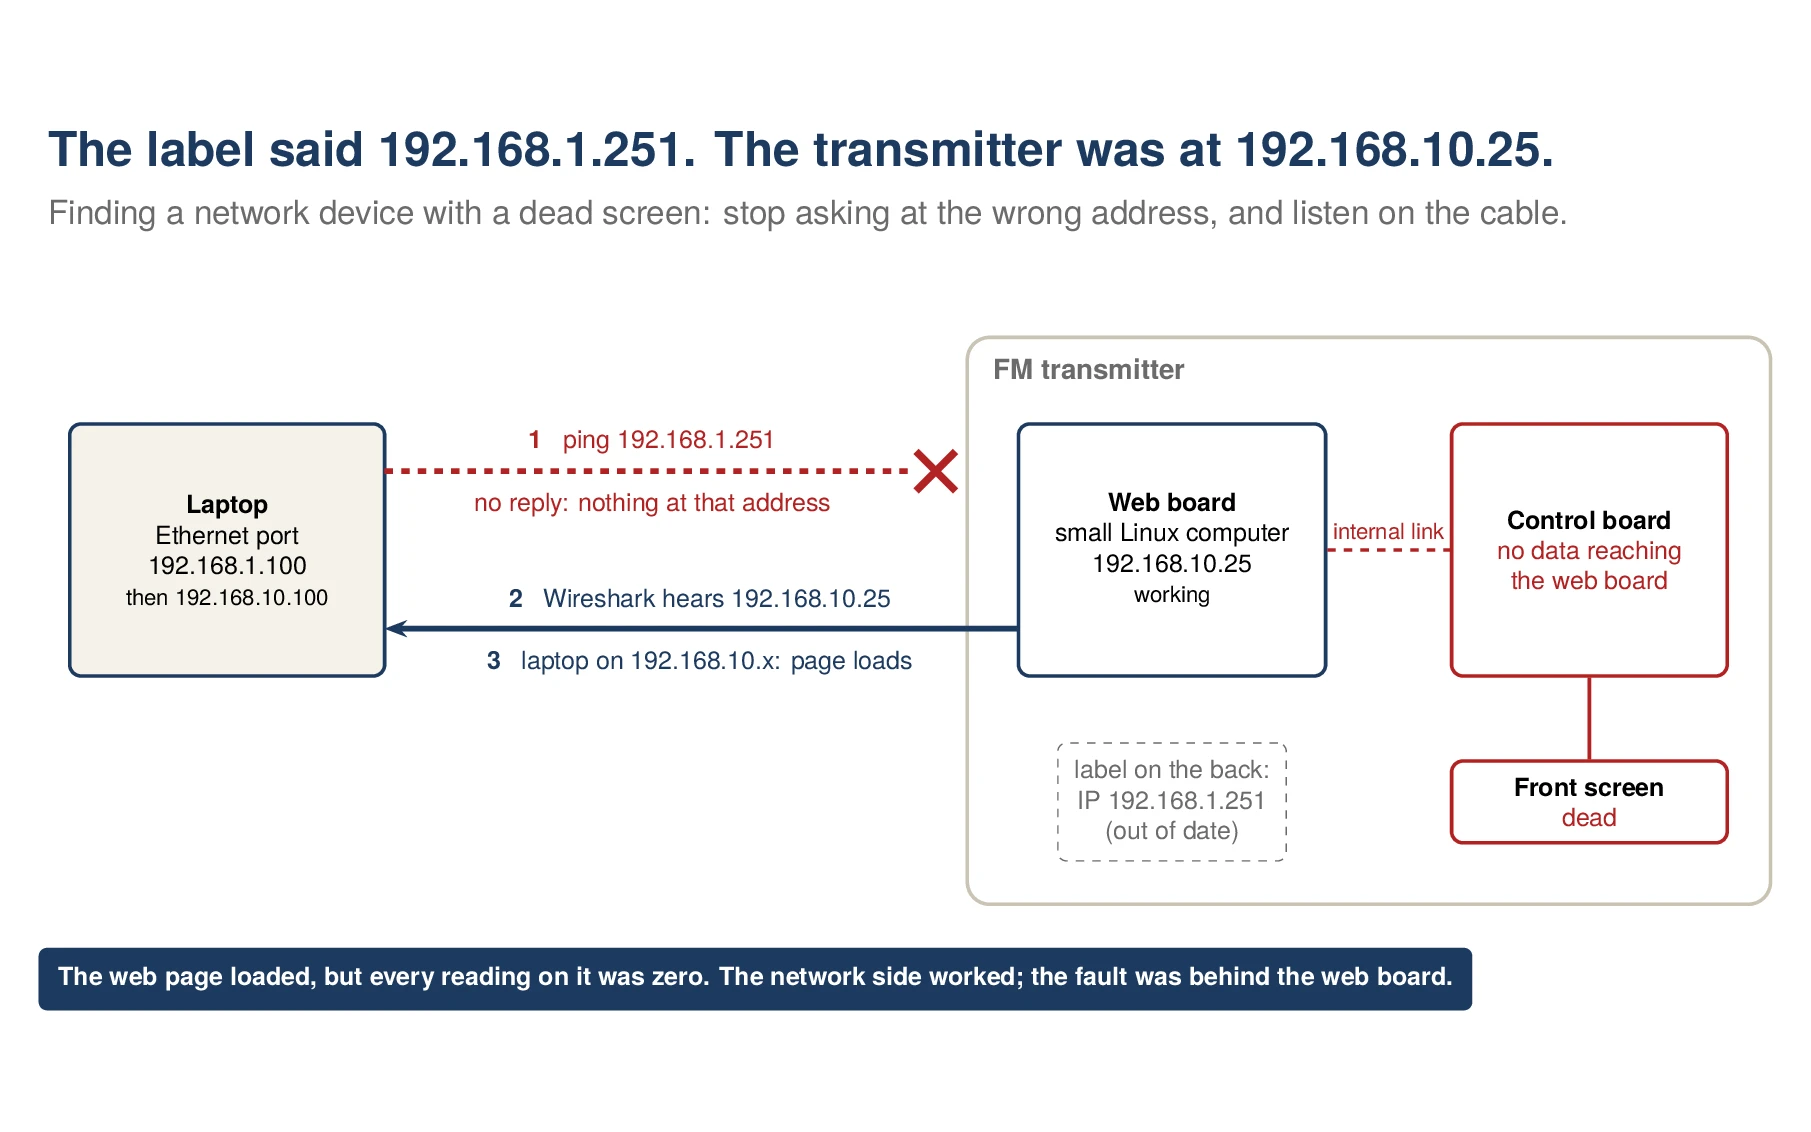
The front screen of a Mozart 1000 NeXT FM transmitter on our bench was dead. Without it, the only other way to see what the transmitter is doing is its built-in web page, reached through the LAN port on the back. The label beside that port gives the address 192.168.1.251. Nothing answered there.
This is how we found the transmitter at a different address, 192.168.10.25, and what its web page then told us about the fault. Nothing in the method is specific to transmitters. It works for any network device whose screen is dead or that never had one: CCTV recorders, rectifier and site controllers, UPS network cards, PLCs and IP cameras.
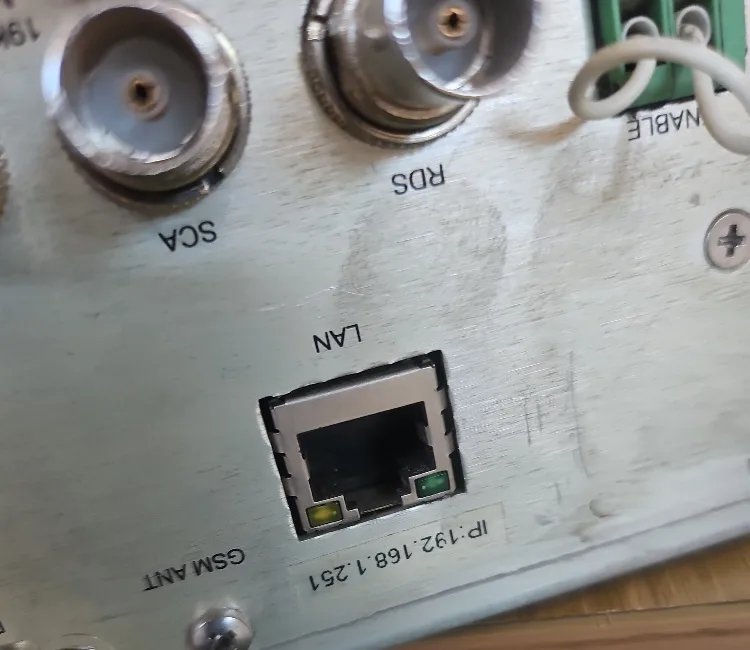
Step 1: Connect the cable
Older network ports needed a crossover cable to connect two computers directly, and a normal (straight) cable to connect a computer to a switch. Most ports made today sort this out themselves: they detect the cable and swap the transmit and receive pairs as needed. This is called auto-MDI-X. Only one of the two ends needs it, and nearly all gigabit laptop ports have it.
- Use a normal straight cable from the laptop to the device. A laptop with no network port can use a USB Ethernet adapter.
- Check the link lights on both ports. If they light, the cable and both ports are working electrically. That says nothing yet about IP addresses.
Step 2: Put the laptop on the device's network
Most equipment like this does not hand out addresses (it runs no DHCP server), so the laptop's Ethernet port needs a fixed address in the same range as the device.
- Press Win+R, type
ncpa.cpland press Enter. Right-click the Ethernet adapter (not Wi-Fi, not Bluetooth) and choose Properties, then Internet Protocol Version 4 (TCP/IPv4). - Choose "Use the following IP address". Enter 192.168.1.100, subnet mask 255.255.255.0, and leave the default gateway blank.
The mask 255.255.255.0 means the first three numbers must match. A laptop at 192.168.1.100 can talk directly to anything from 192.168.1.1 to 192.168.1.254, and to nothing else. Pick a last number that no other device on the cable uses.
Check the setting with ipconfig. It lists only the laptop's own addresses, never the device's, so don't expect to see 192.168.1.251 there. Under the Ethernet adapter you should see the address you just set. An address starting 169.254 means the adapter is still set to get an address automatically, found no DHCP server and gave itself one.
Step 3: Ping it, and read the answer properly
In PowerShell or Command Prompt, type ping 192.168.1.251. This is what we got:
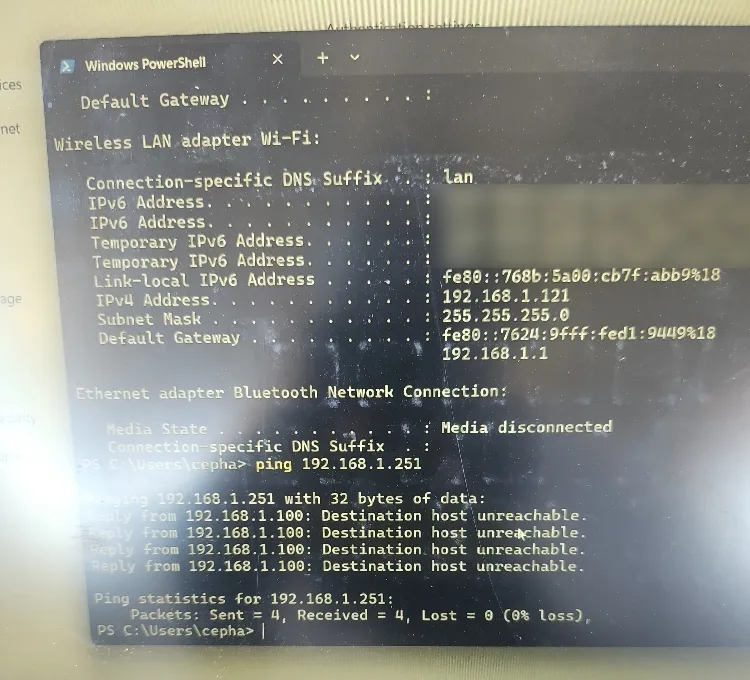
Two things in this output catch people out.
- The replies come from the laptop, not the device. Before it can send a ping on a local network, the laptop broadcasts an ARP request, "who has 192.168.1.251?", to learn the device's hardware address. "Reply from 192.168.1.100: Destination host unreachable" is the laptop reporting that nobody answered. Nothing on the cable was using 192.168.1.251.
- Windows reports 0% loss. It counts those error messages as replies: "Received = 4, Lost = 0". A ping has only worked if the replies come from the address you pinged and show a time, such as "Reply from 192.168.1.251: bytes=32 time<1ms".
The screenshot shows a second problem. The laptop's Wi-Fi was connected to the office network, which also uses 192.168.1.x. With two adapters on the same range, Windows has to choose one for each packet, and it may not choose the cable. Turn Wi-Fi off while you work on a device directly. Here it was not the cause: the replies came from the Ethernet adapter's address, so the request had gone out on the cable. With Wi-Fi off, the ping still failed.
Step 4: Local and remote
Many transmitters have a Local/Remote setting that decides where control commands are accepted from. It is easy to suspect when the network won't answer. On this transmitter it was not the cause: once we had the right address, the web page loaded while the transmitter was in LOCAL. If a device's remote setting does block its web page, its manual will say so.
Step 5: Scan the range, and know its limits
When the address on the label doesn't answer, the usual next step is an IP scanner such as Advanced IP Scanner or Angry IP Scanner. It tries every address in a range and lists what answers. Ours, across 192.168.1.1 to 192.168.1.254, found no transmitter. A scanner has two limits:
- It only looks where you tell it to. If the device's address was changed to another range, you have to guess which. Equipment often uses ranges such as 192.168.0.x, 192.168.1.x or 10.0.0.x, but it can be set to anything. The 192.168.x.x private range alone has 65,536 addresses, and the 10.x.x.x range over 16 million.
- The laptop can only reach a range it has an address in. Probes to any other range go to the default gateway, and on a cable straight to the device there isn't one.
Step 6: Listen instead of asking
A packet capture tool such as Wireshark, which is free, records every frame that arrives at the laptop's network port, whatever IP address it comes from. The laptop's IP settings decide what it will send and answer; they don't filter what the cable delivers. So if the device sends anything at all, from any address, Wireshark shows it.
- Install Wireshark. On Windows it installs Npcap, the capture driver, with it.
- Start a capture on the Ethernet adapter.
- Restart the device, or unplug and replug the cable at the device end. Devices often send something when they boot or when the link comes up.
- Wait a minute, then stop the capture.
Our first capture showed only the laptop talking:
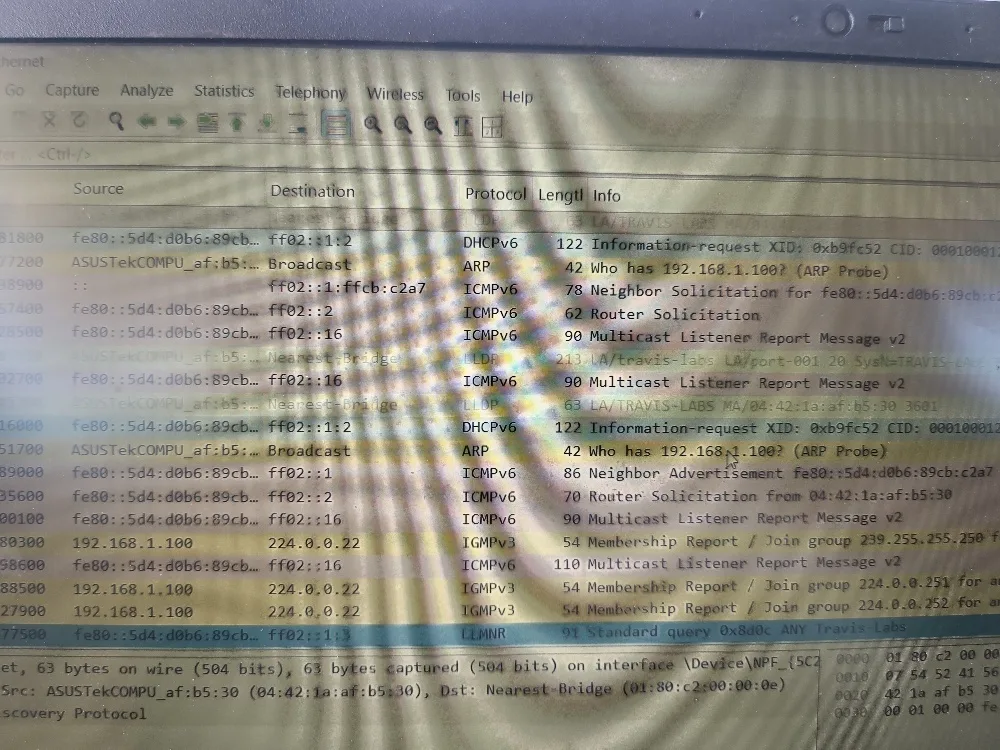
A laptop is noisy, so hide its own traffic. Find its hardware (MAC) address with ipconfig /all, under "Physical Address", and enter a display filter like this one in Wireshark, using your own address written with colons:
eth.src != 04:42:1a:af:b5:30What remains is whatever the device sent. In our case it was this:
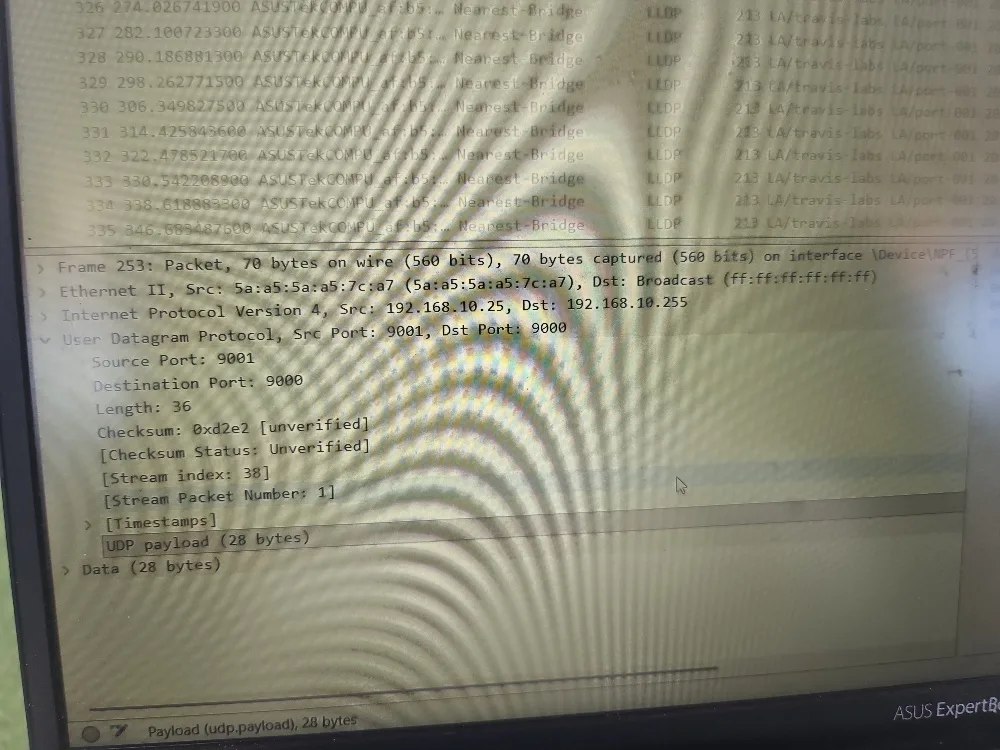
The transmitter was at 192.168.10.25, in a different range from the 192.168.1.251 on its label. The label was out of date, and no ping or scan in 192.168.1.x could ever have found it.
The packet shows one more thing. The transmitter's hardware address was 5a:a5:5a:a5:7c:a7. That is not a manufacturer's registered address: the "a" in the first pair marks it as locally set, and 5a:a5:5a:a5 is a repeating test pattern. It looks like a placeholder set in software. If you put two such units on one network, check that their hardware addresses differ.
Step 7: Move the laptop and log in
- Change the laptop's Ethernet address to the device's range: 192.168.10.100, mask 255.255.255.0, gateway blank.
- Run
ping 192.168.10.25. Real replies come from 192.168.10.25 and show a time. - Open http://192.168.10.25 in a browser and log in.
If the device still accepts the manufacturer's default password, change it once the device is working again. This web page has buttons that switch the transmitter's RF output on and off.
What the web page told us
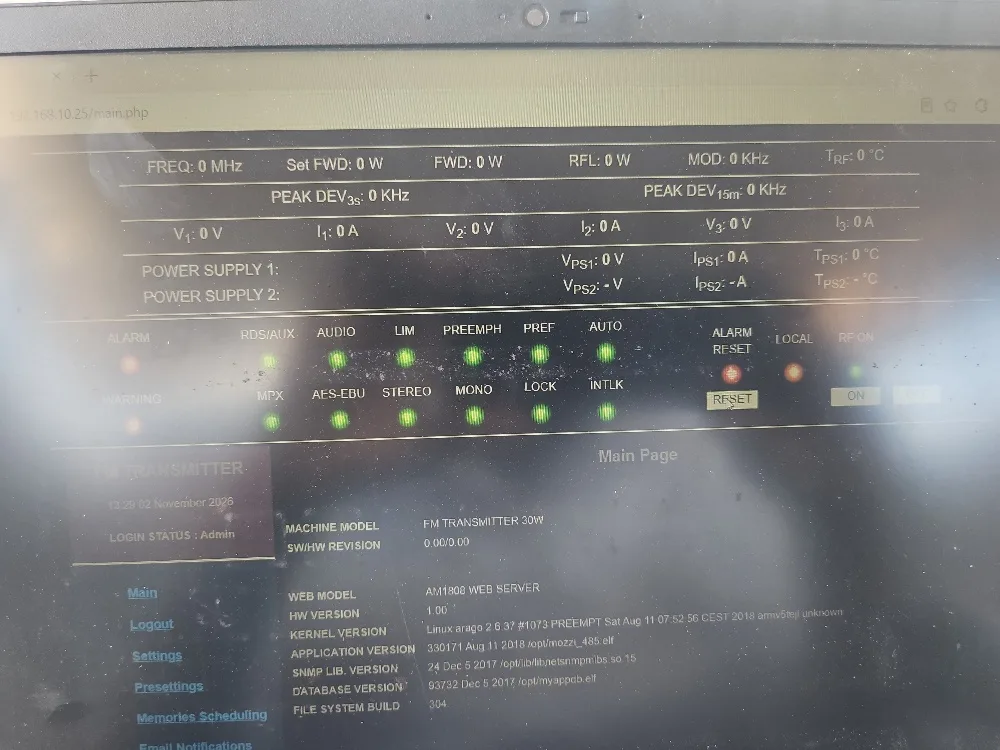
The page loaded and the login worked. But:
- Every reading was zero: frequency 0 MHz, forward and reflected power 0 W, modulation 0 kHz, and every voltage, current and temperature.
- The SW/HW revision read 0.00/0.00, and the model read "FM TRANSMITTER 30W", not the 1 kW transmitter on the bench.
- The status lights contradicted each other. STEREO and MONO were both lit, for example. They look like defaults, not readings.
The lower half of the page explains why. It describes the web board: "AM1808 WEB SERVER", a Linux kernel built in August 2018, and an application called mozzi_485. The AM1808 is a Texas Instruments ARM9 processor. So the web page runs on its own small Linux computer inside the transmitter, separate from the board that controls the transmitter. The "485" in the application's name suggests it talks to the control board over an RS-485 serial link, but we have not confirmed that.
The web computer was clearly working. It booted, took its address, broadcast on the network and served its page. What the page showed was an absence of data from the control board.
Together with the dead front screen, that pointed away from the network and into the transmitter: the control board, its power supply, or the link between the two boards. It matched our bench diagnosis of this unit, which found that the small power module feeding the control section had failed and left the control board running on low voltage.
If you work inside the transmitter
- Disconnect the mains and let the supplies discharge before opening the cover. A 1 kW FM transmitter has mains-voltage power supplies and high-current DC supplies for its RF amplifiers.
- Reseat the ribbon cables between the web board, the display and the control board, and look for heat damage.
- Measure the control board's supply voltages before replacing anything on it.
- Never switch the RF on without a proper load: the antenna system or a dummy load rated for the transmitter's power. Without one, reflected power can destroy the output transistors.
Checklist for any network device with a dead screen
- Normal cable. Check the link lights.
- Wi-Fi off. Fixed address on the Ethernet port, in the range on the label.
- Ping, and check where the replies come from.
- No answer: capture with Wireshark while the device restarts, filtering out the laptop.
- Move the laptop to whatever range the device is sending from.
- Once in, read the page closely. Zeros and blank revisions point inside the device, not at the network.
- When it is fixed, update the label, record the address somewhere safe, change the default password, and keep equipment off the range your office Wi-Fi uses.
We repair broadcast and telecom RF equipment, and the power supplies and control electronics inside it, at our lab in Lusaka. See our telecom and RF repair work or contact us.